2007. 5. 20. 12:05
3. 사용자 인터페이스
따라서 처음 사용자에게는 복잡하고 어려운 것처럼 생각하지만 그렇게 생각을 할 필요가 없다. 라우터에 프롬프트는 두 개의 사용자 인터페이스로 구분이 된다. 하나는 사용자 모드 (user mode)와 다른 하나는 특권 모드(Privileged mode)이다. 사용자 모드 프롬프트 상태는 “>” 이 것으로 나타나며 특권 모드상태는 “#”으로 나타난다. 이렇게 두 가지로 구분되는 것은 보안때문이다.
이 차이점은 차후 자세히 설명을 하겠다. 그리고 보안 문제도 차후 설명을 하겠다. 사용자 모드 프롬프트는 사용이 제한되어 있으며, 특권 모드은 설정, 변경, 삭제 및 장애 처리 등을 할 수 있는 권한을 가지고 있다. 사용자 모드와 특권 모드로 들어가는 방법을 아래와 같다.
Router con0 is now available
Press RETURN to get started.
Cisco> 사용자 모드
Cisco>enable
Password:
Cisco# 특권 모드
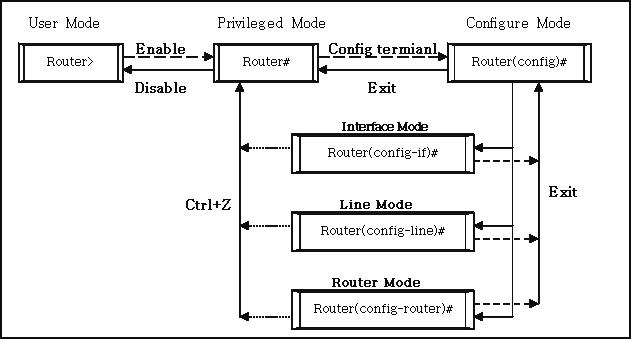
“enable” 이라는 명령을 사용자 모드에서 입력함으로 구성할 수 있는 권한을 취득할 수가 있다. 이 특권 모드에서도 두 가지 모드로 나눌 수가 있는데, 하나는 볼수 있는 모드 또 다른 하나는 설정, 변경, 삭제할 수 있는 모드 이 것을 글로벌 설정모드라고 한다. 볼수있는 모드는 주로 show (단축 명령은 sh)와 debug라는 명령이 있으며, 글로벌 설정모드는 주로 설정 하거나 삭제 또는 변경을 한다. 아래 그림은 라우터 IOS 명령어 모드이다.
◈ 도움말 기능
라우터에 Console이나 Telnet으로 접속 후 password를 입력하여 접속 후 프롬프트 상에서 도움말 기능을 사용하여 쉽게 정보를 얻을 수가 있다. 사용 방법은 프롬프트 상태에서 물음표(?)를 입력하면 되며, 사용중 명령어가 생각이 나지 않을 경우 이 방법을 사용하면 도움이 될 것이다. 도움말 사용방법은 아래와 같다.
Router#?
Exec commands:
<1-99> Session number to resume
bfe For manual emergency modes setting
clear Reset functions
clock Manage the system clock
configure Enter configuration mode
connect Open a terminal connection
copy Copy configuration or image data
debug Debugging functions (see also 'undebug')
disable Turn off privileged commands
< 중간 생략 >
Cisco#t?
telnet terminal test traceroute tunnel
Cisco#s?
*s=show send setup show slip
start-chat systat
telnet terminal test traceroute tunnel
Cisco#s?
*s=show send setup show slip
start-chat systat
또한 문자열 다음에 사용할 수 있는 기능들을 알고 싶을 경우 한 문자열을 입력한 후 물음표를 입력하면 된다. 이 방법은 주로 문자열이 너무 길어 외우기가 힘들고 주로 사용하지 않는 명령어를 사용할 경우 효율적이다. 그럼 도움말 기능을 이용하여 라우터의 날짜와 시간을 셋팅을 해 보도록 하자.
Cisco#clock ?
set Set the time and date
Cisco#clock set ?
hh:mm:ss Current Time (hh:mm:ss)
Cisco#clock set 14:15:00 ?
<1-31> Day of the month
MONTH Month of the year
Cisco#clock set 14:15:00 19 ?
MONTH Month of the year
Cisco#clock set 14:15:00 19 Feb ?
<1993-2035> Year
Cisco#clock set 14:15:00 19 Feb 2002 ?
<cr>
Cisco#
set Set the time and date
Cisco#clock set ?
hh:mm:ss Current Time (hh:mm:ss)
Cisco#clock set 14:15:00 ?
<1-31> Day of the month
MONTH Month of the year
Cisco#clock set 14:15:00 19 ?
MONTH Month of the year
Cisco#clock set 14:15:00 19 Feb ?
<1993-2035> Year
Cisco#clock set 14:15:00 19 Feb 2002 ?
Cisco#
이와 같이 한 문자열을 입력하고 그 뒤에 물음표를 치면 문자열 뒤에 사용할 수 있는 명령어들이 계속 나타난다. 제일 마지막 출력문을 보면 “cr
이 carriage return은 더 이상 문자열 뒤에 사용할 명령어가 없다는 뜻이다. 이 방법은 문자열 뒤에 무엇을 사용해야 하는지 모를 경우 사용하면 많은 도움이 될 것이며, 또한 문자열 뒤에 계속 물음표를 사용하다가 보면 아래와 같은 형식으로 화면이 출력이 될 수도 있다.
Cisco#show clock ?
detail Display detailed information
<cr>
detail Display detailed information
위의 내용은 문자열 뒤에 문장을 더 사용할 수도 있고 더 이상 사용하고 싶지 않을 경우 return key를 입력해도 무관하다는 것이다. 그리고 “show”(단축 명령어 sh)는 “보여주다”는 뜻으로 여러분이 보고자 하는 내용을 볼 때 사용한다. 그럼 조금 전 여러분이 셋팅 했던 시간이 정상적으로 셋팅이 되었는지 결과를 보려면 아래와 같다.
Cisco#show clock
14:16:51.067 UTC Tue Feb 19 2002
14:16:51.067 UTC Tue Feb 19 2002
확인한 결과 정상적으로 여러분이 입력했던 시간과 날짜가 나타났으며, 명령어를 사용하다가 보면 이상한 메시지를 볼 때가 있다.
Router#config terminel
^ % Invalid input detected at '^' marker.
^ % Invalid input detected at '^' marker.
위에 나타난 것은 캐럿심벌(^)이라고도 한다. 캐럿심벌은 틀린 문장 부분을 나타내 준다.
이 출력된 메시지들를 잘 기억하면 여러분이 작업을 하면서 많은 도움이 될 것이다.
Cisco(config)#interface s
% Incomplete command.
% Incomplete command.
이 명령은 실행 할 수 없다는 뜻이다. 즉, 이러한 문장은 없다는 것이다.
Cisco#show st
% Ambiguous command: "sh st"
% Ambiguous command: "sh st"
이 내용은 필요한 키워드 값을 입력하지 않았음을 나타나는 것이다. 이런 메시지가 나올 경우 문자열 뒤에 물음표를 입력한 후 확인하면 문제를 알수 있을 것이다.
아래 명령은 편집하고 history를 확인할 수 있다.
Ctrl + A: 커맨드라인 맨 처음으로 커서 이동
Ctrl + E: 커맨드라인 맨 끝으로 커서 이동
Ctrl + B: 커맨드라인에서 한글자 뒤로 커서 이동
Ctrl + F: 커맨드라인에서 한글자 앞으로 커서 이동
Ctrl + P or UP arrow: 최근의 명령어에서부터 거슬러서 recall.
Ctrl + N or Down arrow: 직전에 입력된 명령어를 보여 줌
Esc + B: 커맨드라인에서 한 단어 뒤로 커서 이동
Esc + F: 커맨드라인에서 한 단어 앞으로 커서 이동
Show history: 명령어 buffer의 내용을 모두 보여 준다.
Terminal history size: 명령어 buffer의 크기를 지정해 준다. (최대 256까지)
Terminal no editing: 위와 같은 advanced editing 기능을 쓰지 않는다.
Terminal editing: advanced editing 기능을 다시 쓴다.
Ctrl + Z: configuration mode로부터 빠져 나온다.
Tab: 여러분을 위한 명령어 입력을 끝냄
Show history 명령어는 라우터에서 입력했던 최근 10개의 명령을 볼 수가 있으며, 10개 이상 명령어를 입력을 하면 가장 최근에 입력했던 순서대로 나타난 다. 즉, 여러분이 라우터상에서 무슨 명령어를 입력을 했는지 확인을 하고 싶을 경우 사용하면 된다. 이제까지 라우터에서 사용했던 명령어를 보고자 할 경우 아래와 같이 특권 모드에서 “show history” 커맨드를 입력하면 된다.
Router#show history
Show protocol
show history
config t
show int s0
show int
show int s1
show use
show terminal
show clock
Show protocol
show history
config t
show int s0
show int
show int s1
show use
show terminal
show clock
현재 history 사이즈를 보고자 할 경우 “show terminal” 커맨드로 볼 수가 있다.
Router#show terminal
Line 2, Location: "", Type: " "
!
생 략
!
Status: Ready, Active, No Exit Banner
Capabilities: none
Modem state: Ready
!
생 략
!
Session limit is not set.
Time since activation: never
Editing is enabled.
History is enabled, history size is 10.
Full user help is disabled
Allowed transports are pad telnet rlogin. Preferred is telnet.
No output characters are padded
No special data dispatching characters
Group codes: 0
또한 history 버퍼 사이즈를 “terminal history size”명령어로 아래와 같이 변경을 할 수도 있다.
Router#terminal history size ?
<0-256> Size of history buffer
Router#terminal history size 20
Line 2, Location: "", Type: " "
!
생 략
!
Status: Ready, Active, No Exit Banner
Capabilities: none
Modem state: Ready
!
생 략
!
Session limit is not set.
Time since activation: never
Editing is enabled.
History is enabled, history size is 20.
Full user help is disabled
Allowed transports are pad telnet rlogin. Preferred is telnet.
No output characters are padded
No special data dispatching characters
Group codes: 0
명령어를 사용하다 보면 아래와 같이 일부 명령어가 왼쪽으로 10문자 분량만큼 이동할 때 가 있는데 이 것은 프롬프트 상에서 입력한 문장이 넘무 길어 우측으로 10문자 분량만큼 이동하여 “$”라 표시를 한다.
Router#config terminal
Enter configuration commands, one per line. End with CNTL/Z.
Router(config)#$ 120 permit tcp 162.20.10.0 0.0.0.255 162.20.20.0 0.0.0.2
Router(config)#access-list 120 permit tcp 162.20.10.0 0.0.0.255 162.20.20.0 0.0.0.2
Enter configuration commands, one per line. End with CNTL/Z.
Router(config)#$ 120 permit tcp 162.20.10.0 0.0.0.255 162.20.20.0 0.0.0.2
Router(config)#access-list 120 permit tcp 162.20.10.0 0.0.0.255 162.20.20.0 0.0.0.2
'네트워크관리사' 카테고리의 다른 글
| 필기 - 네트워크관리사 2급 기출문제 1회 ~ 32회 (0) | 2007.07.30 |
|---|---|
| Router - 4. 패스워드와 배너설정(글로벌 모드) (0) | 2007.05.24 |
| Router – 2. Router 설치 (0) | 2007.05.15 |
| Router – 1. Router의 개념 (0) | 2007.05.15 |
| 실기 - 전체 수검진행 과정 (0) | 2007.05.05 |


