2007. 8. 17. 18:24
5. 인터페이스 환경설정
라우터에서 인터페이스 환경설정은 가장 기본이 되며 가장 중요하다. 다른 장치들과 서로 통신을 하려면 이 인터페이스가 있어야 한다. 인터페이스란 다른 글에서 잠시 설명 했지만 데이터전송에 있어서는 두 개의 시스템 또는 장치를 물리적으로 연결하는 접속조건이다. 먼저 그럼 Ethernet 인터페이스를 보면 아래와 같다.
Interface ethernet0(단축 명령어 int e0)명령으로 interface 모드로 들어왔다. 이미 설명을 했지만 라우터 기종의 따라 인터페이스는 다르다. 2500라우터는 한 개의 Ethernet 포트가 있다. 7000, 3500, 3600, 그리고 2600라우터는 2500라우터 설정 방식과는 조금 다르다. 2500라우터에서는 interface type number로 인터페이스를 구성을 할 수가 있지만 2600라우터는 interface type slot/port로 구성을 할 수가 있다는 것이다. 만약 설정 모드에서 Interface fastethernet 0만 입력하고 Enter key를 누른다면 아래와 같은 오류 메시지가 나타난다.
2600라우터부터는 전체 명령어를 사용해야한다. 즉, interface type slot/port를 모두 입력을 해야 한다는 것이다.
Fastethernet 0/0에 의미는 아래 그림으로 표현을 해보면 다음과 같다.

즉, Fastethernet 0/0은 첫 번째 Slot0에서 Port0를 선택을 했다는 것이며, 단축 명령어로는 int fa 0/0으로 사용한다.
◈ 인터페이스의 IP 어드레스 설정
인터페이스에 IP 어드레스를 설정을 하는 이유는 서로 다른 특성을 갖는 컴퓨터끼리 상호 연결할 수 있게 하는 것이다. 즉, IP 어드레스는 주소라고 생각을 하면 된다. 인터페이스 Ethernet 0 IP 어드레스를 설정하는 방법은 글로벌 설정모드에서 아래와 같이 입력하면 된다.
여러분이 현재 Ethernet 0 IP 어드레스를 지정을 했다. 위에서 보면 “ip address”라는 명령어로 설정을 했는데 그 이유는 인터페이스 IP 어드레스를 설정하기 위해서는 “ip address”를 사용해야 한다. 또한 “no shoutdown”이라는 것은 interfaces에 기본적으로 작동정지 상태를 동작할 수 있게 하는 것이다. 만약 이 “no shoutdown”명령을 실행하지 않는다면 Ethernet 0는 동작을 하지 않을 것이다. 자세한 설명은 “show interface”명령에서 설명하도록 하겠다.
두 번째 서브넷 인터페이스에 어드레스를 추가할 경우 “secondary”명령을 사용하면 된다.
즉, Ethernet에 두개 이상의 ip address를 설정을 하고자 할 때 사용을 한다.
가입자 ip address가 192.168.1.0 ∼ 192.168.1.15 서브넷 마스크는 255.255.255.240와 192.168.1.32 ∼ 192.168.1.46 서브넷 마스크 255.255.255.240 일 때 Secondary를 사용함으로써 두 개의 구역에 대해서 설정할 수 있다.
시스코라우터 7000 또는 7500시리즈는 VIP(Versatile Interface Processor)를 가지고 있다.
3600과 인터페이스 설정 방법은 조금 다른다. 정의하기 위해서는 interface type slot/port adapter/port number이다.
◈ Show interface 명령어
Show interface명령어로 설정된 환경을 검증하고 또한 장애처리 등을 확인을 할 수가 있다. 아래와 같이 특권모드에서 “show interface Ethernet 0” 커맨드를 입력을 하면 아래와 같이 출력이 될것이다.
위에서 보면 Ethernet 0에 administratively down과 line protocol down이 되어 있다. 이유는 바로 이미 잠시 설명을 했지만 “no shutdown”을 실행하지 않았기 때문이다. “show running-config”(단축명령어 sh run)으로 확인을 하면 다음과 같다.
Interface Ethernet 0을 보면 “shutdown”이 나타나 있다. “no shutdown”을 실행후 다시 확인을 하면 정상적으로 구동이 되는 것을 확인할 수가 있을 것이다.
“Serial0 is up” 인터페이스가 Active상태인지 아닌지를 확인하는 것으로 회선의 연결상태를 나타낸다. 즉, DCE(CSU/FDSU/DSU등)장비와 라우터간 인터페이스 신호가 정상적인지를 확인할 수 있다. “line protocol is up” line의 상태를 확인할 수 있다. 상대측 라우터와 회선이 정상적으로 연결되었는지, Interface Encapsulation이 일치하는지를 알 수 있다.
이것은 인터페이스 회선상태 분석에서 설명을 하도록 하겠다.
◈ 시리얼 링크에 대역폭 설정하기
시리얼 인터페이스에 대역폭을 설정하는 것은 실제적인 링크 속도와는 상관없다. 디폴트 대역폭은 1.544Mbps로서 T1으로 속도를 나타낸다. 시리얼 링크 대역폭은 RIP에서는 사용되지 않고 IGRP, EIGRP, OSPF에서는 사용을 한다. 만약 라우팅 프로토콜 RIP를 사용을 한다면 대역폭을 설정할 필요가 없다. Bandwidth 커맨드를 이용하여 설정된 대역폭을 변경할 수가 있다. 예를 들어 회선이 E1급 일경우 아래와 같이 설정하면 된다.
◈ 환경설정보기와 저장
여러분이 설정했던 내용들을 라우터에 저장을 해야 한다. 하지만 저장을 하지 않아도 내용은 변경이 된다는 것은 이미 알고 있을 것이다. 만약 구성했던 내용들을 저장을 하지 않고 라우터의 전원을 리 셋을 한다면 구성했던 모든 내용 들은 어느새 사라지고 처음부터 다시 설정을 해야 한다. 아래 표는 라우터 상태를 확인 할수 있는 명령어 이다.
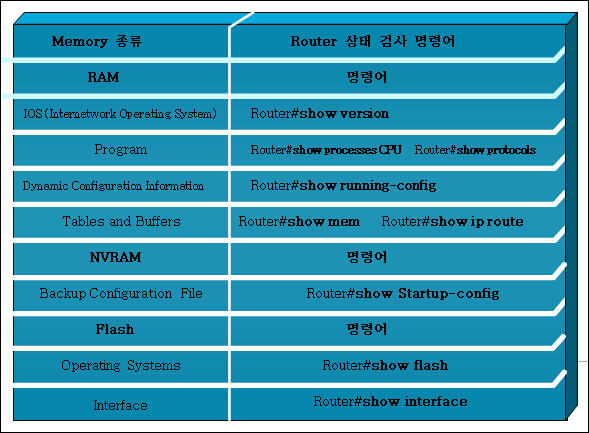
DRAM에서 구동하고 있는 내용을 보는 커맨드는 “show running-config”이며, NVRAM에서 구동하고 있는 내용을 보는 커맨드는 ”show startup-config”이다. DRAM에 있는 파일 내용을 보기 위해서는 특권모드에서 아래와 같이 커맨드를 입력하면 된다.
특권모드에서 NVRAM의 있는 파일의 내용을 보기 위해서는 특권모드에서 “show startup-config” (단축명령어 sh start) 커맨드로 아래와 같이 입력을 하면 NVRAM의 있는 내용을 볼 수가 있다.
NVRAM에 있는 파일의 내용을 확인 함으로써 아무것도 구성되어 있지 않는 것을 확인을 할 수가 있다. DRAM의 있는내용을 NVRAM으로 저장을 할 수 있는 명령어는 “copy running-config startup-config”이다. 즉, DRAM의 있는 파일의 내용을 NVRAM으로 저장을 한다는 것이다. 단축명령어로써는 “copy run stat” or “write memory”(단축 명령은 wr m)이다. 아래와 같이 커맨드를 이용하여 DRAM의 있는 파일의 내용을 NVRAM으로 저장을 하면된다.
DRAM의 있는 파일의 내용을 NVRAM으로 저장 후 아래와 같이 확인을 하면 알수가 있을 것이다.
◈ 패스워드 암호화
패스워드 암호화는 일반적으로 다른 사람이 패스워드를 알아 볼수 없게 설정하는 것이다. Enable secret 패스워드는 디폴틀로 암호화가 되지만 Enable password는 암호화가 되지 않는다. Enable password를 암호화를 시킬경우 수동으로 암호화를 설정 해야한다. 특권모드에서 Enable password를 확인 하면 입력했던 패스워드가 그대로 출력이 되지만 Enable secret 패스워드는 암호화가 되어서 출력이 된 것을 확인 할 수가 있다.
Enable password를 Enable secret 패스워드 처럼 암호화를 시킬수 있는 커맨드는 바로 “service password-encryption”이다. Enable password를 암호화 시킬수 있는 방법은 아래와 같다.
Enable password를 수동으로 암호화 한 것을 확인 할 수 있는 커맨드는 “show running-config”이다.
출력된 파일의 내용을 보면 Enable password가 암호화가 된 것을 확인 할 수가 있는데, 아무리 Enable password를 암호화를 시켜다 해도 이것은 프로그램으로 암호화 확인 할 수가 있다. 암호화된 것을 확인하는 방법은 보안 설정에서 설명을 할 것이다.
◈ Description 명령
Description는 관리자가 라우터를 모터링 했을 때 각각의 인터페이스의 설명문을 사용하는 것이다. 즉, 무슨 인터페이스가 어디하고 연결이 되었는지, 어떤 작업을 하면 어떻게 사용되고 주의 할 것은 무엇인지 표시를 나타내는 것이다. 설명문은 기계의 따라 몇 줄 밖에 안되는 경우도 있고, 몇 쪽이 넘어가는 긴 부분으로 되어 있는 경우도 있다. Description를 설정하기 전에 특권모드에서 “show interface ethernet 0” 커맨드로 확인을 하기 바란다.
설정된 것을 확인 하기위해서는 아래와 같이 커맨드를 이용하면 설정된 것을 확인 할 수가 있다.
그럼 Description를 인터페이스 시리얼 0으로 설정하는 방법은 아래와 같다.
◈ Cisco logging 등록 방법
Cisco logging는 누가 언제 라우터에 접속을 했는지 확인하는 것이다. 먼저 아래와 같이 셋팅후 “show logging(단축 명령어 sh log)”커맨드로 확인을 할 수가 있다.
확인한 결과 날짜와 시간 그리고 IP 어드레스를 볼 수가 있다. “clear logging” 커맨드는 인터페이스상의 logging을 클리어 시켜주는 것이다. 특권모드에서 아래와 같이 커맨드를 사용하면 인터페이스상의 logging의 내용을 클리어 시킬수가 있다.
◈ Show controllers 사용법
“Show controllers” 명령은 물리적인 인터페이스에 관한 정보를 표시하고 시리얼포트에 연결된 케이블의 형식도 나타내 주는 하나의 명령어 이다. WAN에서 연결된 장치에는 DCE(Circuit Terminating Equipment)와 DTE(Data Terminal Equipment) 2가지가 있는데 DCE는 전용회선 사업자 쪽에 해당하며, DTE는 일반적으로 가입자쪽에 해당한다.
다시말하면 “show controllers” 커맨드는 시리얼 포트의 연결된 정보를 나타내 주는 것이다.
출력된 내용을 보면 시리얼 0의 연결된 케이블 형식의 “V.35 DTE cable”라는 것을 볼수가 있다. V.35 케이블을 사용하고 있으며 DTE 케이블이 접속된 것을 알수가 있다. DCE는 “clock rate”라는 명령어를 사용하여 DTE쪽에 속도를 제공하도록 설정을 해야한다. 즉, DCE는 전용회선 사업자가 클럭속도를 설정하여 DTE쪽에 속도를 제공해야 하며, DTE는 DSU로부터 클럭속도를 제공받는다. DCE 시리얼 인터페이스에 클럭속도를 설정하는 법은 아래와 같다.
라우터에서 인터페이스 환경설정은 가장 기본이 되며 가장 중요하다. 다른 장치들과 서로 통신을 하려면 이 인터페이스가 있어야 한다. 인터페이스란 다른 글에서 잠시 설명 했지만 데이터전송에 있어서는 두 개의 시스템 또는 장치를 물리적으로 연결하는 접속조건이다. 먼저 그럼 Ethernet 인터페이스를 보면 아래와 같다.
Router#config terminal
Enter configuration commands, one per line. End with CNTL/Z.
Router(config)#interface ?
Async Async interface
BVI Bridge-Group Virtual Interface
Dialer Dialer interface
Ethernet IEEE 802.3
Group-Async Async Group interface
Lex Lex interface
Loopback Loopback interface
Null Null interface
Port-channel Ethernet Channel of interfaces
Serial Serial
Tunnel Tunnel interface
Virtual-Template Virtual Template interface
Virtual-TokenRing Virtual TokenRing
Router(config)#interface ethernet ?
< 0 - 0 > Ethernet interface number
Router(config)#interface ethernet0
Router(config-if)#
Interface ethernet0(단축 명령어 int e0)명령으로 interface 모드로 들어왔다. 이미 설명을 했지만 라우터 기종의 따라 인터페이스는 다르다. 2500라우터는 한 개의 Ethernet 포트가 있다. 7000, 3500, 3600, 그리고 2600라우터는 2500라우터 설정 방식과는 조금 다르다. 2500라우터에서는 interface type number로 인터페이스를 구성을 할 수가 있지만 2600라우터는 interface type slot/port로 구성을 할 수가 있다는 것이다. 만약 설정 모드에서 Interface fastethernet 0만 입력하고 Enter key를 누른다면 아래와 같은 오류 메시지가 나타난다.
Router(config)#interface fastethernet 0
% Incomplete command
% Incomplete command
2600라우터부터는 전체 명령어를 사용해야한다. 즉, interface type slot/port를 모두 입력을 해야 한다는 것이다.
Router#config terminal
Router(config)#interface fastethernet ?
<0 ? 1> FastEthernet interface number
Router(config)#interface fastethernet 0?
/
Router(config)#interface fastethernet 0/?
<0 ? 1> FastEthernet interface number
Router(config)#interface fastethernet 0/0
Router(config-if)#^Z
Router#
Router(config)#interface fastethernet ?
<0 ? 1> FastEthernet interface number
Router(config)#interface fastethernet 0?
/
Router(config)#interface fastethernet 0/?
<0 ? 1> FastEthernet interface number
Router(config)#interface fastethernet 0/0
Router(config-if)#^Z
Router#
Fastethernet 0/0에 의미는 아래 그림으로 표현을 해보면 다음과 같다.
즉, Fastethernet 0/0은 첫 번째 Slot0에서 Port0를 선택을 했다는 것이며, 단축 명령어로는 int fa 0/0으로 사용한다.
◈ 인터페이스의 IP 어드레스 설정
인터페이스에 IP 어드레스를 설정을 하는 이유는 서로 다른 특성을 갖는 컴퓨터끼리 상호 연결할 수 있게 하는 것이다. 즉, IP 어드레스는 주소라고 생각을 하면 된다. 인터페이스 Ethernet 0 IP 어드레스를 설정하는 방법은 글로벌 설정모드에서 아래와 같이 입력하면 된다.
Router#config terminal
Enter configuration commands, one per line. End with CNTL/Z.
Router(config)#interface Ethernet 0
Router(config-line)#ip address 131.36.29.1 255.255.255.0
Router(config-line)#no shutdown
Router(config-line)#^Z
Router#
Enter configuration commands, one per line. End with CNTL/Z.
Router(config)#interface Ethernet 0
Router(config-line)#ip address 131.36.29.1 255.255.255.0
Router(config-line)#no shutdown
Router(config-line)#^Z
Router#
여러분이 현재 Ethernet 0 IP 어드레스를 지정을 했다. 위에서 보면 “ip address”라는 명령어로 설정을 했는데 그 이유는 인터페이스 IP 어드레스를 설정하기 위해서는 “ip address”를 사용해야 한다. 또한 “no shoutdown”이라는 것은 interfaces에 기본적으로 작동정지 상태를 동작할 수 있게 하는 것이다. 만약 이 “no shoutdown”명령을 실행하지 않는다면 Ethernet 0는 동작을 하지 않을 것이다. 자세한 설명은 “show interface”명령에서 설명하도록 하겠다.
두 번째 서브넷 인터페이스에 어드레스를 추가할 경우 “secondary”명령을 사용하면 된다.
즉, Ethernet에 두개 이상의 ip address를 설정을 하고자 할 때 사용을 한다.
가입자 ip address가 192.168.1.0 ∼ 192.168.1.15 서브넷 마스크는 255.255.255.240와 192.168.1.32 ∼ 192.168.1.46 서브넷 마스크 255.255.255.240 일 때 Secondary를 사용함으로써 두 개의 구역에 대해서 설정할 수 있다.
Router#config terminal
Enter configuration commands, one per line. End with CNTL/Z.
Router(config)#interface ethernet0
Router(config-if)#ip address 162.20.20.1 255.255.255.0 ?
secondary Make this IP address a secondary address
<cr>
Router(config-if)#ip address 162.20.20.1 255.255.255.0 secondary
Router(config-if)#no shutdown
Router(config-if)#^Z
Router#sh running-config
Building configuration...
Current configuration:
!
version 12.0
service udp-small-servers
service tcp-small-servers
no service password-encryption
!
hostname Cisco
ip address 162.20.20.1 255.255.255.0 secondary
ip address 162.20.10.1 255.255.255.0
no ip directed-broadcas
생략
시스코라우터 7000 또는 7500시리즈는 VIP(Versatile Interface Processor)를 가지고 있다.
3600과 인터페이스 설정 방법은 조금 다른다. 정의하기 위해서는 interface type slot/port adapter/port number이다.
Router(config)#interface Ethernet 0/0/0
◈ Show interface 명령어
Show interface명령어로 설정된 환경을 검증하고 또한 장애처리 등을 확인을 할 수가 있다. 아래와 같이 특권모드에서 “show interface Ethernet 0” 커맨드를 입력을 하면 아래와 같이 출력이 될것이다.
Router#show interface Ethernet 0
Ethernet0 is administratively down, line protocol is up
Hardware is Lance, address is 0030.94e5.b215 (bia 0030.94e5.b215)
Description: Interface
Internet address is 162.20.10.1/24
MTU 1500 bytes, BW 10000 Kbit, DLY 1000 usec, rely 128/255, load 1/255
Encapsulation ARPA, loopback not set, keepalive set (10 sec)
ARP type: ARPA, ARP Timeout 04:00:00
!
!
생략
위에서 보면 Ethernet 0에 administratively down과 line protocol down이 되어 있다. 이유는 바로 이미 잠시 설명을 했지만 “no shutdown”을 실행하지 않았기 때문이다. “show running-config”(단축명령어 sh run)으로 확인을 하면 다음과 같다.
Router#show running-config
Building configuration...
Current configuration:
!
version 12.0
no service password-encryption
no service udp-small-servers
no service tcp-small-servers
!
hostname Router
!
enable secret 5 $1$KHkH$npEgYyCSZ1XdBdmEcsWuh0
enable password cisco
!
ip subnet-zero
!
interface Ethernet0
description Interface
ip address 162.20.10.1 255.255.255.0
shutdown
!
!
interface Serial0
description Serial Interface
!
!
생략
Interface Ethernet 0을 보면 “shutdown”이 나타나 있다. “no shutdown”을 실행후 다시 확인을 하면 정상적으로 구동이 되는 것을 확인할 수가 있을 것이다.
Router#show interface Ethernet 0
Ethernet0 is up, line protocol is up
Hardware is Lance, address is 0030.94e5.b215 (bia 0030.94e5.b215)
Description: Interface
Internet address is 162.20.10.1/24
MTU 1500 bytes, BW 10000 Kbit, DLY 1000 usec, rely 128/255, load 1/255
Encapsulation ARPA, loopback not set, keepalive set (10 sec)
ARP type: ARPA, ARP Timeout 04:00:00
!
!
생략
Router#show interface serial 0
Serial0 is up, line protocol is up
Hardware is HD64570
Description: Serial Interface
Internet address is 10.10.30.2/24
MTU 1500 bytes, BW 1544 Kbit, DLY 20000 usec, rely 255/255, load 1/255
Encapsulation HDLC, loopback not set, keepalive set (10 sec)
Last input never, output never, output hang never
Last clearing of "show interface" counters never
Input queue: 0/75/0 (size/max/drops); Total output drops: 0
!
!
생략
“Serial0 is up” 인터페이스가 Active상태인지 아닌지를 확인하는 것으로 회선의 연결상태를 나타낸다. 즉, DCE(CSU/FDSU/DSU등)장비와 라우터간 인터페이스 신호가 정상적인지를 확인할 수 있다. “line protocol is up” line의 상태를 확인할 수 있다. 상대측 라우터와 회선이 정상적으로 연결되었는지, Interface Encapsulation이 일치하는지를 알 수 있다.
이것은 인터페이스 회선상태 분석에서 설명을 하도록 하겠다.
◈ 시리얼 링크에 대역폭 설정하기
시리얼 인터페이스에 대역폭을 설정하는 것은 실제적인 링크 속도와는 상관없다. 디폴트 대역폭은 1.544Mbps로서 T1으로 속도를 나타낸다. 시리얼 링크 대역폭은 RIP에서는 사용되지 않고 IGRP, EIGRP, OSPF에서는 사용을 한다. 만약 라우팅 프로토콜 RIP를 사용을 한다면 대역폭을 설정할 필요가 없다. Bandwidth 커맨드를 이용하여 설정된 대역폭을 변경할 수가 있다. 예를 들어 회선이 E1급 일경우 아래와 같이 설정하면 된다.
Router#config terminal
Enter configuration commands, one per line. End with CNTL/Z.
Router(config)#interface serial 0
Router(config-if)#bandwidth ?
<1-10000000> Bandwidth in kilobits
Router(config-if)#bandwidth 2048
Router(config-if)#^Z
Router#
Enter configuration commands, one per line. End with CNTL/Z.
Router(config)#interface serial 0
Router(config-if)#bandwidth ?
<1-10000000> Bandwidth in kilobits
Router(config-if)#bandwidth 2048
Router(config-if)#^Z
Router#
◈ 환경설정보기와 저장
여러분이 설정했던 내용들을 라우터에 저장을 해야 한다. 하지만 저장을 하지 않아도 내용은 변경이 된다는 것은 이미 알고 있을 것이다. 만약 구성했던 내용들을 저장을 하지 않고 라우터의 전원을 리 셋을 한다면 구성했던 모든 내용 들은 어느새 사라지고 처음부터 다시 설정을 해야 한다. 아래 표는 라우터 상태를 확인 할수 있는 명령어 이다.
DRAM에서 구동하고 있는 내용을 보는 커맨드는 “show running-config”이며, NVRAM에서 구동하고 있는 내용을 보는 커맨드는 ”show startup-config”이다. DRAM에 있는 파일 내용을 보기 위해서는 특권모드에서 아래와 같이 커맨드를 입력하면 된다.
Cisco#show running-config
Building configuration...
Current configuration:
!
version 12.0
service udp-small-servers
service tcp-small-servers
no service password-encryption
!
hostname Cisco
!
enable secret 5 $1$3nMK$iZHfwDc7ivOCJvbbuRIFx.
enable password cisco
!
!
interface Ethernet0
ip address 162.20.10.1 255.255.255.0
!
[생략]
특권모드에서 NVRAM의 있는 파일의 내용을 보기 위해서는 특권모드에서 “show startup-config” (단축명령어 sh start) 커맨드로 아래와 같이 입력을 하면 NVRAM의 있는 내용을 볼 수가 있다.
Cisco#show startup-config
Using 828 out of 32762 bytes
Current configuration:
!
version 12.0
service udp-small-servers
service tcp-small-servers
no service password-encryption
!
hostname Cisco
!
enable secret 5 $1$3nMK$iZHfwDc7ivOCJvbbuRIFx.
enable password cisco
!
!
interface Ethernet0
no ip address
!
[생략]
Using 828 out of 32762 bytes
Current configuration:
!
version 12.0
service udp-small-servers
service tcp-small-servers
no service password-encryption
!
hostname Cisco
!
enable secret 5 $1$3nMK$iZHfwDc7ivOCJvbbuRIFx.
enable password cisco
!
!
interface Ethernet0
no ip address
!
[생략]
NVRAM에 있는 파일의 내용을 확인 함으로써 아무것도 구성되어 있지 않는 것을 확인을 할 수가 있다. DRAM의 있는내용을 NVRAM으로 저장을 할 수 있는 명령어는 “copy running-config startup-config”이다. 즉, DRAM의 있는 파일의 내용을 NVRAM으로 저장을 한다는 것이다. 단축명령어로써는 “copy run stat” or “write memory”(단축 명령은 wr m)이다. 아래와 같이 커맨드를 이용하여 DRAM의 있는 파일의 내용을 NVRAM으로 저장을 하면된다.
Cisco#copy running-config startup-config
Building configuration...
[OK]
Building configuration...
[OK]
DRAM의 있는 파일의 내용을 NVRAM으로 저장 후 아래와 같이 확인을 하면 알수가 있을 것이다.
Cisco#show startup-config
Using 828 out of 32762 bytes
Current configuration:
!
version 12.0
service udp-small-servers
service tcp-small-servers
no service password-encryption
!
hostname Cisco
!
interface Ethernet0
ip address 162.20.10.1 255.255.255.0
!
[생략]
Using 828 out of 32762 bytes
Current configuration:
!
version 12.0
service udp-small-servers
service tcp-small-servers
no service password-encryption
!
hostname Cisco
!
interface Ethernet0
ip address 162.20.10.1 255.255.255.0
!
[생략]
◈ 패스워드 암호화
패스워드 암호화는 일반적으로 다른 사람이 패스워드를 알아 볼수 없게 설정하는 것이다. Enable secret 패스워드는 디폴틀로 암호화가 되지만 Enable password는 암호화가 되지 않는다. Enable password를 암호화를 시킬경우 수동으로 암호화를 설정 해야한다. 특권모드에서 Enable password를 확인 하면 입력했던 패스워드가 그대로 출력이 되지만 Enable secret 패스워드는 암호화가 되어서 출력이 된 것을 확인 할 수가 있다.
Router#show running-config
Building configuration...
Current configuration:
!
version 12.0
생략
hostname Router
!
enable secret 5 $1$E0gH$g7Uihx8ITBK3QuJkgLX2h0
enable password cisco
!
생략
Building configuration...
Current configuration:
!
version 12.0
생략
hostname Router
!
enable secret 5 $1$E0gH$g7Uihx8ITBK3QuJkgLX2h0
enable password cisco
!
생략
Enable password를 Enable secret 패스워드 처럼 암호화를 시킬수 있는 커맨드는 바로 “service password-encryption”이다. Enable password를 암호화 시킬수 있는 방법은 아래와 같다.
Router#config terminal
Enter configuration commands, one per line. End with CNTL/Z.
Router(config)#service ?
alignment Control alignment correction and logging
compress-config Compress the configuration file
config TFTP load config files
decimal-tty Interpret tty line numbers in decimal.
disable-ip-fast-frag Disable IP particle-based fast fragmentation
exec-callback Enable exec callback
exec-wait Delay EXEC startup on noisy lines
password-encryption Encrypt system passwords
!
생략
Router(config)#service password-encryption
Router(config)#^Z
Router#
Enable password를 수동으로 암호화 한 것을 확인 할 수 있는 커맨드는 “show running-config”이다.
Router#show running-config
Building configuration...
Current configuration:
!
version 11.2
생략
hostname Router
!
enable secret 5 $1$E0gH$g7Uihx8ITBK3QuJkgLX2h0
enable password 7060F1F221C1F
!
생략
Building configuration...
Current configuration:
!
version 11.2
생략
hostname Router
!
enable secret 5 $1$E0gH$g7Uihx8ITBK3QuJkgLX2h0
enable password 7060F1F221C1F
!
생략
출력된 파일의 내용을 보면 Enable password가 암호화가 된 것을 확인 할 수가 있는데, 아무리 Enable password를 암호화를 시켜다 해도 이것은 프로그램으로 암호화 확인 할 수가 있다. 암호화된 것을 확인하는 방법은 보안 설정에서 설명을 할 것이다.
◈ Description 명령
Description는 관리자가 라우터를 모터링 했을 때 각각의 인터페이스의 설명문을 사용하는 것이다. 즉, 무슨 인터페이스가 어디하고 연결이 되었는지, 어떤 작업을 하면 어떻게 사용되고 주의 할 것은 무엇인지 표시를 나타내는 것이다. 설명문은 기계의 따라 몇 줄 밖에 안되는 경우도 있고, 몇 쪽이 넘어가는 긴 부분으로 되어 있는 경우도 있다. Description를 설정하기 전에 특권모드에서 “show interface ethernet 0” 커맨드로 확인을 하기 바란다.
Router#show interface ethernet 0
Ethernet0 is up, line protocol is up
Hardware is Lance, address is 0010.7b80.0b59 (bia 0010.7b80.0b59)
Internet address is 162.20.30.1/24
MTU 1500 bytes, BW 10000 Kbit, DLY 1000 usec, rely 255/255, load 1/255
Encapsulation ARPA, loopback not set, keepalive set (10 sec)
ARP type: ARPA, ARP Timeout 04:00:00
Last input 00:03:32, output 00:00:06, output hang never
Last clearing of "show interface" counters never
Queueing strategy: fifo
[생략]
Router#config terminal
Enter configuration commands, one per line. End with CNTL/Z.
Router(config)#interface Ethernet 0
Router(config-if)#description Ethernet Interface
Router(config-if)#^Z
Router#
설정된 것을 확인 하기위해서는 아래와 같이 커맨드를 이용하면 설정된 것을 확인 할 수가 있다.
Router#show interface Ethernet 0
Ethernet0 is up, line protocol is up
Hardware is Lance, address is 0030.94e5.b215 (bia 0030.94e5.b215)
Description: Ethernet Interface
Internet address is 162.20.10.1/24
MTU 1500 bytes, BW 10000 Kbit, DLY 1000 usec, rely 128/255, load 1/255
Encapsulation ARPA, loopback not set, keepalive set (10 sec)
ARP type: ARPA, ARP Timeout 04:00:00
Last input never, output 00:00:09, output hang never
Last clearing of "show interface" counters never
Queueing strategy: fifo
!
!
생략
그럼 Description를 인터페이스 시리얼 0으로 설정하는 방법은 아래와 같다.
Router#config terminal
Router(config)#interface serial 0
Router(config-if)#description Serial Interface
Router(config-if)#^Z
Router#show interface serial 0
Serial0 is up, line protocol is up
Hardware is HD64570
Description: Serial Interface
Internet address is 162.30.20.1/24
MTU 1500 bytes, BW 1544 Kbit, DLY 20000 usec, rely 255/255, load 1/255
Encapsulation HDLC, loopback not set, keepalive set (10 sec)
Last input never, output never, output hang never
Last clearing of "show interface" counters never
Input queue: 0/75/0 (size/max/drops); Total output drops: 0
Queueing strategy: weighted fair
Output queue: 0/1000/64/0 (size/max total/threshold/drops)
Conversations 0/0/256 (active/max active/max total)
Reserved Conversations 0/0 (allocated/max allocated)
!
생략
◈ Cisco logging 등록 방법
Cisco logging는 누가 언제 라우터에 접속을 했는지 확인하는 것이다. 먼저 아래와 같이 셋팅후 “show logging(단축 명령어 sh log)”커맨드로 확인을 할 수가 있다.
Router#config terminal
Enter configuration commands, one per line. End with CNTL/Z.
Router(config)#logging buffered
Router(config)#service timestamps debug datetime show-timezone
Router(config)#service timestamps log datetime show-timezone
Router(config)#^Z
Router#show logging
Syslog logging: enabled (0 messages dropped, 0 flushes, 0 overruns)
Console logging: level debugging, 346 messages logged
Monitor logging: level debugging, 0 messages logged
Trap logging: level critical, 0 message lines logged
Buffer logging: level debugging, 346 messages logged
Log Buffer (8192 bytes):
Jan 16 18:42:51: %SYS-5-CONFIG_I: Configured from console by network on vty3 (128.134.74.61)
Jan 16 18:44:31: %SYS-5-CONFIG_I: Configured from console by network on vty4 (128.134.74.61)
Jan 1 00:19:53: %STANDBY-6-STATECHANGE: Standby: 2: FastEthernet0 state Standby
-> Active
확인한 결과 날짜와 시간 그리고 IP 어드레스를 볼 수가 있다. “clear logging” 커맨드는 인터페이스상의 logging을 클리어 시켜주는 것이다. 특권모드에서 아래와 같이 커맨드를 사용하면 인터페이스상의 logging의 내용을 클리어 시킬수가 있다.
Router#clear logging
Router#show logging
Syslog logging: enabled (0 messages dropped, 0 flushes, 0 overruns)
Console logging: level debugging, 346 messages logged
Monitor logging: level debugging, 0 messages logged
Trap logging: level critical, 0 message lines logged
Buffer logging: level debugging, 346 messages logged
Log Buffer (8192 bytes):
◈ Show controllers 사용법
“Show controllers” 명령은 물리적인 인터페이스에 관한 정보를 표시하고 시리얼포트에 연결된 케이블의 형식도 나타내 주는 하나의 명령어 이다. WAN에서 연결된 장치에는 DCE(Circuit Terminating Equipment)와 DTE(Data Terminal Equipment) 2가지가 있는데 DCE는 전용회선 사업자 쪽에 해당하며, DTE는 일반적으로 가입자쪽에 해당한다.
다시말하면 “show controllers” 커맨드는 시리얼 포트의 연결된 정보를 나타내 주는 것이다.
Router#show controllers s 0
RouterB#sh controllers s 0
HD unit 0, idb = 0xCC4FC, driver structure at 0xD1988
buffer size 1524 HD unit 0, V.35 DTE cable
cpb = 0x61, eda = 0x48DC, cda = 0x48F0
RouterB#sh controllers s 0
HD unit 0, idb = 0xCC4FC, driver structure at 0xD1988
buffer size 1524 HD unit 0, V.35 DTE cable
cpb = 0x61, eda = 0x48DC, cda = 0x48F0
출력된 내용을 보면 시리얼 0의 연결된 케이블 형식의 “V.35 DTE cable”라는 것을 볼수가 있다. V.35 케이블을 사용하고 있으며 DTE 케이블이 접속된 것을 알수가 있다. DCE는 “clock rate”라는 명령어를 사용하여 DTE쪽에 속도를 제공하도록 설정을 해야한다. 즉, DCE는 전용회선 사업자가 클럭속도를 설정하여 DTE쪽에 속도를 제공해야 하며, DTE는 DSU로부터 클럭속도를 제공받는다. DCE 시리얼 인터페이스에 클럭속도를 설정하는 법은 아래와 같다.
Router#config terminal Enter configuration commands, one per line. End with CNTL/Z.
Router(config)#interface serial 1
Router(config-if)#clock rate ?
Speed (bits per second)
1200
2400
4800
9600
19200
38400
56000
64000
72000
[생략]
Router(config-if)#clock rate 64000
Router(config-if)#^Z
Router#
Router(config)#interface serial 1
Router(config-if)#clock rate ?
Speed (bits per second)
1200
2400
4800
9600
19200
38400
56000
64000
72000
[생략]
Router(config-if)#clock rate 64000
Router(config-if)#^Z
Router#
'네트워크관리사' 카테고리의 다른 글
| 필기 - 네트워크관리사 2급 기출문제 33회 ~ 37회 (2) | 2008.10.23 |
|---|---|
| 필기 - 네트워크관리사 1급 기출문제 1회 ~ 13회 (3) | 2007.10.08 |
| 필기 - 네트워크관리사 2급 기출문제 1회 ~ 32회 (0) | 2007.07.30 |
| Router - 4. 패스워드와 배너설정(글로벌 모드) (0) | 2007.05.24 |
| Router - 3.사용자 인터페이스와 도움말 (0) | 2007.05.20 |
